Press Brake Terminology Explained: From Machine Anatomy to CNC Control

Factory-sale Equipment
We have over 20 years in manufacturing. 
Press Brake
Laser Cutting Machine
Panel Bender
Hydraulic Shear
Get FREE Quote
Publish Date: March 26, 2026

I once saw a kid fresh out of trade school correctly point to the "upper beam" on a diagram. Ten minutes later, I found him resting his hand on the actual beam while the hydraulic pump was humming. He knew the term, but he didn’t understand the weight behind it. A press brake is a 100-ton steel jaw. The words we use to describe it are not just test labels. They are markers for survival. When you treat the machine’s anatomy like a vocabulary list, you walk blindfolded into a landscape of crushing force and unforgiving geometry. Let me show you why memorizing the manual can get you hurt, and how learning to read the machine’s physical map can keep your fingers intact.

Related: Guide to Press Brake Bending

Why Flashcards Fail: The Risk of Treating Machine Parts as Vocabulary Terms

You can sit in a breakroom flipping through flashcards until you can spell "ram" and "die" in your sleep. That might earn you a certificate. But paper does not bend steel. The moment you step onto the shop floor, those sterile definitions dissolve into the noise of the machinery.

The gap between knowing a definition and physically respecting a pinch point

The manual defines a "pinch point" as any place where a moving part meets a stationary one. It sounds minor. It sounds like catching your sleeve on a door handle. But stand in front of the brake and watch the upper punch drive down into the V-die. Listen to the hydraulic cylinders strain as they force tons of pressure through a gap no wider than a pencil. That is not a pinch. It is a guillotine.

A definition lives in your head, but respect lives in your gut.

When you understand terminology as a physical map instead of a dictionary, your body responds differently. You do not just know what the backgauge is; you sense the rigid boundary it creates, and you instinctively keep your hands clear of the crush zone when the metal snaps upward during a bend. How do veterans know exactly where to stand before the pedal is even pressed?

The credibility tax: Why experienced operators immediately notice gaps in terminology

An old-timer does not need to quiz you to see whether you understand the machine. They watch your hands. If I tell you to "check the crowning," and you look at the top of the machine instead of down at the bed, I know you are translating words rather than visualizing force. Crowning compensates for the machine bending under pressure—it is the literal foundation of a straight bend.

Shop Floor Reality: If you use the wrong term, we assume you will make the wrong move. If you call the punch a "blade," I will immediately take you off the machine, because a blade cuts and a punch bends. Confusing the two shows you do not understand the physics of what we are doing.

We use this language because it serves as a diagnostic tool. When a bend is two degrees off, the way you describe the problem tells me whether you are guessing or reading the geometry. Are you chasing numbers, or are you feeling the metal yield?

How misinterpreting a single operational term turns good metal into scrap

Let's discuss "air bending." The textbook defines it as bending metal without bottoming out in the die. That sounds simple. But imagine you are trying to hold a ±0.5° tolerance on a piece of stainless steel. If you treat "air bending" as just terminology, you will enter the numbers into the CNC and blindly rely on the machine.

However, if you understand it as a physical condition, you recognize that the metal is unsupported between the punch and die. You know that springback—the metal’s tendency to return toward its flat state—will resist you. You anticipate the deflection. You do not simply read the screen; you watch the material curve and listen for stress within the grain. Confusing air bending with bottoming does not just mean failing a written exam. It means crushing the die, breaking the tooling, and sending a hundred dollars of good steel directly into the scrap bin.

AIR BENDING THEORY VS. REALITY

Zone 1: The Anatomy of Pressure (Frame, Ram, and Capacity)

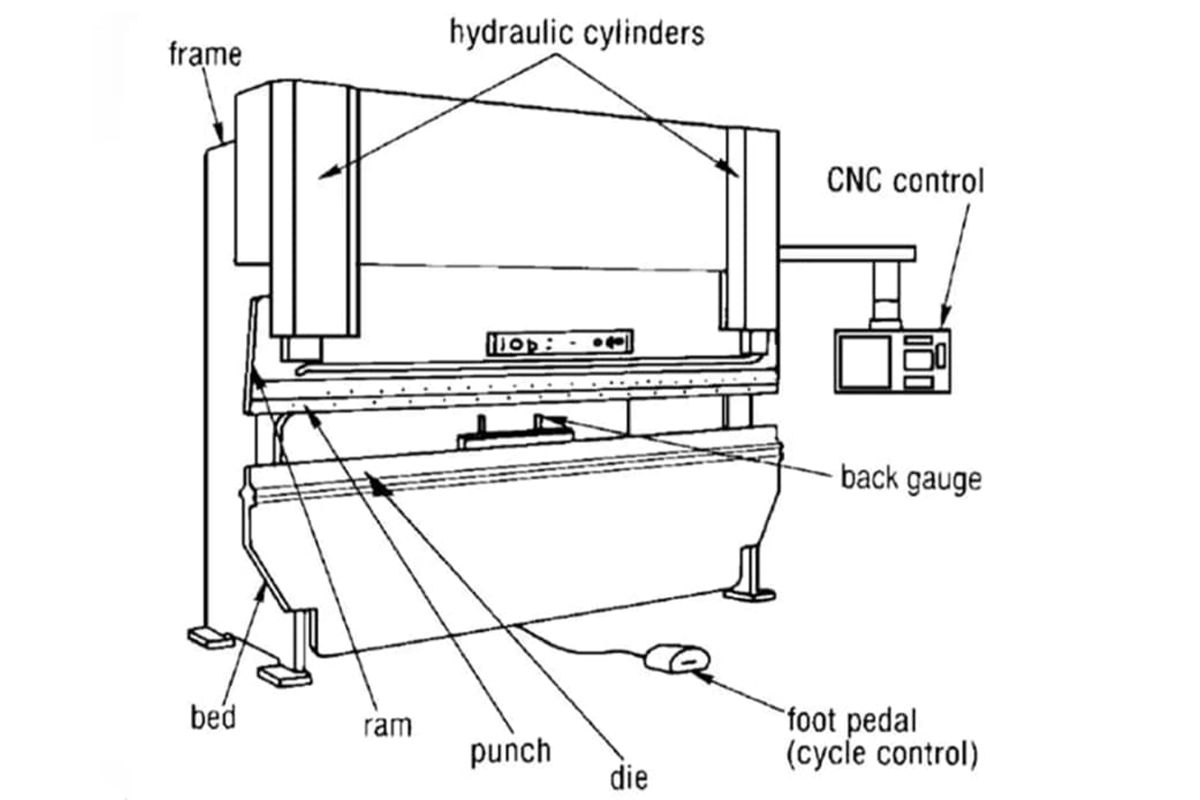
Stand at the end of a 14-foot press brake as it drives 150 tons into a sheet of half-inch steel. If you look carefully along the machine’s length, you will notice something unsettling: the massive steel frame bows at the center. The terminology in this zone—the frame, the ram, the bed—does not describe static structure. It refers to a living, flexing enclosure that barely contains the hydraulic force inside it.

Why does the "ram" receive the credit when the "bed" absorbs most of the force?

Watch an operator press the pedal. The upper beam—the ram—descends with a hiss, carrying the punch. Because the ram moves, your eyes naturally follow it. It seems like the active component in the bend. But while the ram drives the force, the stationary lower beam—the bed—absorbs it.

Every pound of pressure the hydraulic cylinders apply to the sheet metal is met by an equal reaction pushing back against the ram and down into the bed. Under heavy load, both massive steel beams deflect away from each other. The center of the ram arches upward, and the center of the bed sags downward. If you ignore this physical behavior and treat the bed as perfectly rigid, your bends may appear correct at the ends but will be severely under-bent in the middle.

This is why we use crowning.

Crowning physically raises the center of the bed to compensate for the ram’s deflection. You intentionally deform the machine to ensure a straight bend. If the machine’s frame flexes under its own force, what happens to the physical space where your metal sits?

Stroke vs. Daylight: Which measurement actually determines whether your part gets stuck?

You are bending a deep, four-sided electrical enclosure. You complete the final 90-degree flange, the ram retracts fully, and you reach in to remove the box. It will not budge. The sheet metal is completely wrapped around the upper punch. You are stuck.

Beginners look at the machine's "stroke" to determine whether a deep box will clear. Stroke pushes the ram down and pulls it back up; it is simply the total travel distance of the cylinders. However, stroke does not account for your tooling. Daylight measures the maximum physical space between the ram and the bed when the machine is fully open. If your machine has 16 inches of daylight, and you install a tall 6-inch punch and a thick 4-inch die, you have already reduced your escape space by 10 inches before the metal even enters the machine.

You are left with only 6 inches of actual clearance. If your box has 8-inch flanges, it will remain locked on the punch until you unbolt the tooling to slide it off. You may have enough physical space to remove the metal, but do you understand the intense forces confined within that area?

Given that ADH Machine Tool's product portfolio is 100% CNC-based and covers high-end scenarios in laser cutting, bending, grooving, shearing, for teams evaluating practical options here, Tandem Press Brake is a relevant next step.

Press Brake Clearance Stroke vs. Daylight

Tonnage limits: Are you measuring the machine's absolute capacity or the tooling's failure threshold?

A brass specification plate bolted to the side of the frame reads "150 Tons." A new operator sees that label, installs a narrow, deeply curved gooseneck punch to clear a tight return flange, and steps on the pedal to bend a thick plate. The machine reliably delivers the requested pressure. The gooseneck punch shears sideways, scattering hardened steel fragments across the shop floor.

Tonnage is not a universal allowance. It is a localized constraint.

The machine's capacity reflects what the hydraulic cylinders can exert before the internal bypass valves engage. Tooling capacity reflects what the physical geometry of the steel can withstand before it fails. A thick, block-style punch may handle 50 tons per foot. A delicate, acute-angle punch might fracture at 10.

Shop Floor Reality: If you use the machine's maximum tonnage as your operating limit, you will eventually destroy a punch. Always calculate the required load per inch and compare it to the tooling's safe rating, not the number on the machine's plate.

We understand how much force the frame can safely generate and the space it physically occupies, but what occurs when that force finally engages the sheet metal?

Zone 2: The Impact Point (Tooling and Bending Methods)

We know the frame deflects and that the machine's tonnage has fixed limits. Yet all that hydraulic force is irrelevant until the ram brings the tooling down to engage the sheet metal. This is the impact point. The terminology here does not describe inert pieces of steel; it defines the precise physical geometry where significant force compels a flat sheet to deform without fracturing.

Punch angle, die opening, and inside radius: How they work together to determine the final shape

Punch and die

Take a piece of 1/4-inch-thick mild steel. The industry "Rule of Eight" states that your V-die opening should be eight times the material thickness, resulting in a 2-inch die. Beginners often treat this rule as absolute. But replace that mild steel with T6 aluminum, use the same punch in the same 2-inch die, and observe the outside of the bend split open like a zipper.

Beginners assume the sharp tip of the upper punch sets the inside bend radius. They believe the punch functions like a mold. It does not. In modern bending, the die opening controls the inside radius. As the punch presses the metal into the V-die, the sheet bridges the two upper shoulders of the die. For mild steel, the natural inside radius forms at about 16 percent of the die opening width. Using a narrow die forces a tight radius. If that radius is tighter than the material’s grain structure can accommodate, the outer surface cracks.

The punch simply supplies the downward wedge; the die opening determines the true shape of the curve. To prevent that aluminum from tearing, you do not change the punch. You increase the die opening to ten or twelve times the material thickness, allowing the metal to form a larger, safer radius.

Air bending vs. bottoming: Why do we use different terms for the same downward motion?

air bending

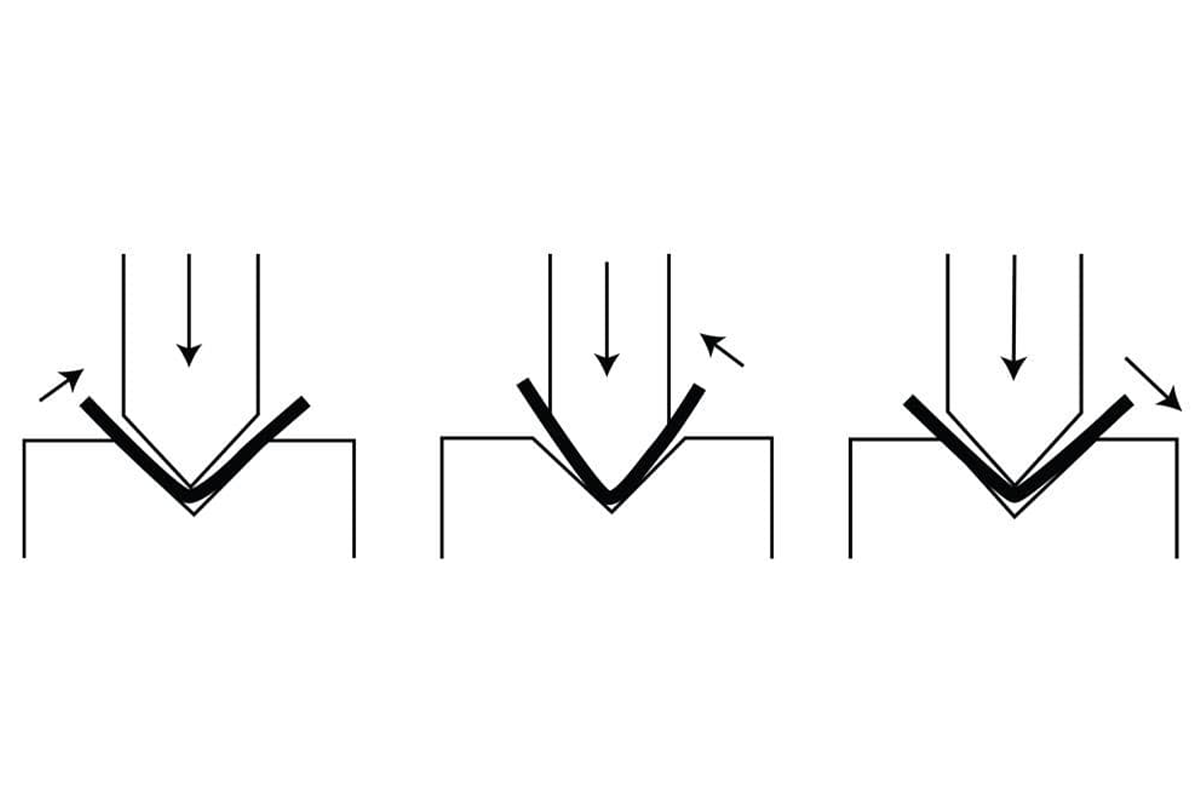
Observe the ram descending. Whether performing air bending or bottoming, the visible motion appears identical: the punch pushes the metal into the V-die. However, the terminology reflects fundamentally different force conditions.

Bottoming is exactly what the name implies. You drive the punch down until the sheet metal is pressed firmly against the sides and bottom of the V-die. The metal is confined and takes on the precise shape of the tooling. Achieving this requires exponentially greater tonnage to overcome the metal’s natural resistance, which quickly increases wear on both the machine and the tooling.

Air bending is a balancing act.

The sheet metal never contacts the bottom of the die. It is supported at exactly three points: the tip of the descending punch and the two upper shoulders of the lower die. The metal remains suspended. Because it is not confined against the die walls, the final angle is controlled entirely by how deeply the punch enters the V-opening. Advancing a fraction of a millimeter further tightens the angle; retracting slightly opens it. We use different terms because bottoming relies on brute-force forming, whereas air bending depends on controlled geometry that reduces strain on the machine.

Springback: The unseen physical force working against your setup

You program the machine for an exact 90-degree bend in high-strength steel. The punch descends, the metal folds, and the digital display confirms the precise depth has been reached. The ram retracts. You take out your square, place it against the flange, and see a gap. The bend measures 94 degrees.

The metal retains its memory of being flat and tends to return to that state.

When the punch forces the sheet into the die, the steel’s internal structure is altered. The grain along the inside of the bend compresses, while the grain on the outside stretches. As soon as the punch lifts and releases pressure, the compressed inner grains push outward and the stretched outer grains contract inward. The steel resists the bend. This phenomenon is known as springback. It is not a calculation mistake or a machine fault; it is stored kinetic energy being released into the part.

Shop Floor Reality: Do not attempt to reach a target angle by programming that exact angle. If you require 90 degrees in stainless steel, you must deliberately overbend the part to 87 degrees, relying on the metal’s strong tendency to recoil so that it settles at 90 once the pedal is released.

Gooseneck vs. straight punches: When does tool geometry matter more than applied pressure?

You are forming a tight U-channel. The first flange has already been bent upward. Now you position the sheet to create the second bend, completing the "U." You press the pedal, and the straight punch descends. As the metal bends, the previously formed flange swings upward like a closing door. Before the bend is complete, that rising flange strikes the thick, vertical body of the straight punch.

The machine does not pause. It continues applying force. The flange collapses, the part is ruined, and the tooling absorbs a severe side load it was never intended to withstand.

This is where tool geometry determines feasibility. A gooseneck punch resembles a cobra poised to strike. It features a substantial undercut—a hollow carved into the steel body directly behind the punch tip. When you perform that same U-channel bend with a gooseneck punch, the rising flange moves into open space. It fits cleanly into the undercut instead of colliding with solid steel. Tool geometry is not an aesthetic preference; it is a map for avoiding collisions.

We have mastered the vertical force between punch and die, and we understand how the metal responds at the point of contact. But to place that bend precisely on the sheet, we must account for the three-dimensional space behind the tooling.

Zone 3: The Spatial Grid (Backgauges and CNC Axes)

X, Y, R, and Z axes: Converting a flat drawing into three-dimensional machine movement

X axis

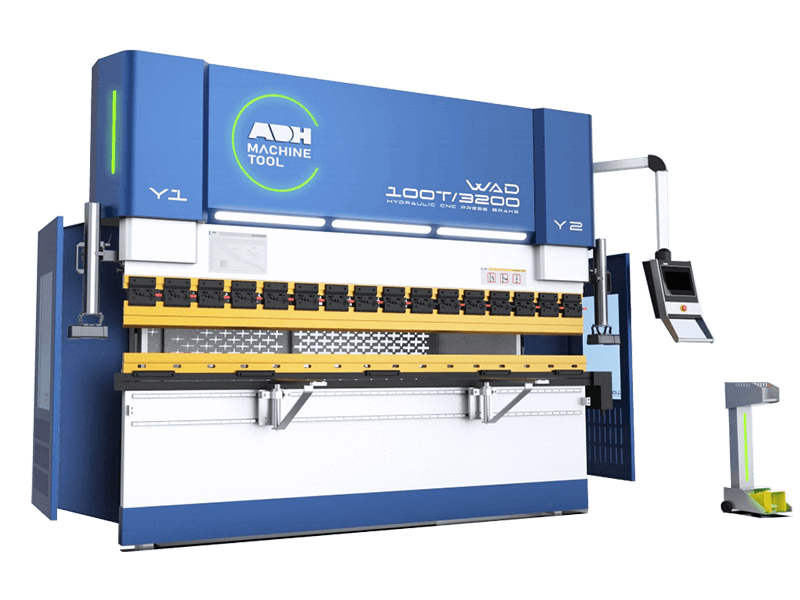
A fifty-pound steel carriage surging forward at a thousand inches per minute—that is what occurs behind the lower die the moment you tap the foot pedal to move to the next step. That forceful motion is your X-axis. It is not merely a value on a digital display; it is a motor-driven wall that establishes the exact flange depth. The R-axis moves that wall up and down to engage the edge of a part that has already been bent upward. The Z-axis shifts the fingers left and right across the bed’s width to support long sheets. And the Y-axis is the ram itself, driving downward to press the metal into the die. In a modern, fully CNC-controlled platform such as a CNC press brake from ADH Machine Tool, these axes are synchronized through intelligent control and continuous R&D refinement, turning raw motor movement into repeatable, high-precision positioning across complex bending sequences.

When you examine a blueprint, you see a flat shape with fixed dimensions. When you program those axes, you are orchestrating a high-speed mechanical sequence in the unseen space behind the tooling. If you enter an incorrect X dimension, the fingers stop in the wrong position, and your flange ends up a quarter-inch too long. If you fail to program a Z-axis retraction on a wide part, the rising flanges will break the backgauge fingers off their tracks.

Backgauge fingers: Why your most reliable reference points also present the greatest collision hazard

Each year in the United States, press brakes are responsible for more than 360 amputations. You might assume these injuries occur only beneath the punch, but safety data consistently identifies the backgauge area during automatic positioning as a leading predictable danger zone. You are trained to rely on the backgauge fingers. You slide your sheet metal firmly against their flat faces to ensure the bend runs perfectly parallel to the edge. They are your most dependable reference points for accuracy.

They are also motorized steel blocks that reposition themselves the moment the ram clears the part. If you reach behind the die to remove a piece of scrap just as the CNC commands a tighter X-axis dimension, those fingers will surge forward. They will pin your hand against the lower die block and crush your bones before the drive motor even detects the resistance.

Shop Floor Reality: Never wrap your thumbs around the back edge of the sheet metal while sliding it against the backgauge. If the CNC program includes an automatic R-axis drop to clear a reverse flange, the fingers will descend instantly, pinching your thumbs between the sheet and the gauge blocks. Push using flat palms.

What "zeroing" actually means in physical terms before you start bending

When you power up a modern hydraulic press brake, the computer starts completely blind. It does not know where the ram is positioned, nor does it know where the backgauge fingers are located. To determine this, you must "zero" the machine. You press a button, and the axes slowly move to their extreme limits until they physically trigger a mechanical limit switch. That click informs the computer exactly where the machine’s physical boundaries are. Every X, Y, R, and Z movement you program for the rest of the shift is then calculated mathematically from that physical reference point.

However, if you are operating an older mechanical press brake, this digital spatial grid is misleading. Mechanical brakes rely on a massive spinning flywheel and a clutch, which means they cannot reverse mid-stroke. If the ram drops below top dead center before the clutch re-engages, gravity takes control. The ram falls, crushing anything beneath it, regardless of what any digital readout indicates. Zeroing a hydraulic machine establishes a dependable mathematical grid; zeroing a mechanical machine merely creates a false sense of security against a heavy iron guillotine.

Given that ADH Machine Tool's product portfolio is 100% CNC-based and covers high-end scenarios in laser cutting, bending, grooving, shearing, for teams evaluating practical options here, Electric Press Brake is a relevant next step.

You can precisely set the X-axis, square the sheet against the fingers, and rely on your zeroed coordinates. But the moment the Y-axis applies tonnage, the immense force required to bend the steel causes the machine itself to flex, introducing hidden variables that no backgauge can correct.

Zone 4: The Hidden Variables (Deflection and Crowning)

Why does a massive steel machine flex at the center during a bend?

Stand in front of a 14-foot, 200-ton press brake and observe its construction. The hydraulic cylinders that generate the crushing force are mounted at the extreme left and right edges of the upper frame. When you step on the pedal, those twin cylinders drive the ram downward, while the sheet metal resists the force. Because the upper ram and lower bed are supported only at their far ends, that intense resistance forces the center of the upper ram to bow upward, while the center of the lower bed sags downward.

Steel behaves like heavy-duty rubber.

Under maximum tonnage, the machine’s massive side frames physically stretch apart, and the center of the bed and ram bow away from each other by as much as thirty-thousandths of an inch. This creates a microscopic, invisible "smile" in the middle of your tooling. The CNC controller’s digital grid assumes the punch and die remain perfectly parallel across the entire fourteen feet. But the harsh reality of bending metal is that the center of the machine is physically retreating from the impact zone. If the center of your die is sinking away from the punch, how can you produce a straight bend?

Crowning: Is it an optional feature or a necessary remedy for machine deflection?

You correct a flexing machine by intentionally altering its flat surface. Crowning is a mechanical remedy built directly into the lower bed to counter deflection. Inside the die holder is a series of opposing steel wedges. When you activate the crowning system, a motor slides those wedges against each other, physically lifting the center of the lower die upward to create a subtle, convex rise. As the ram descends and bows upward under load, that pre-formed rise meets it, closing the gap and keeping the punch and die perfectly parallel under pressure.

Some beginners assume that purchasing a massive, high-tonnage machine removes the need for this. In reality, the opposite is true. Deflection increases nonlinearly with size; a larger press brake magnifies flex not only vertically, but also through elastic stretching in the side frames. A rigid, pre-crowned bed with a fixed curve will fail because it does not account for changes in force, material grade, or off-center loading. You need adjustable crowning to set the precise counter-force for the specific tonnage being applied.

Shop Floor Reality: Never attempt to correct a bowed center by simply increasing the overall machine tonnage. You will overbend the ends of the sheet into sharp, damaged angles, break the tooling at the edges, and send a hundred dollars of good steel straight to the scrap bin while the center remains under-bent. You must lift the center, not crush the entire bed.

If crowning raises the die to meet a flexing ram, what happens to the metal when you ignore this system entirely?

How ignoring these terms results in parts that are perfect at the ends but bowed in the center

Place a 10-foot piece of stainless steel over the die, leave the crowning system off, and lower the ram. When you remove the part and check it with a protractor, the left edge will read exactly 90 degrees. The right edge will read exactly 90 degrees. But the center will read 94 degrees.

Because the machine bowed apart during the stroke, the punch pressed the ends of the sheet to the correct depth, but only lightly compressed the center. The finished part resembles a canoe. The flange opens in the middle, making it completely unusable for welding or assembly. "Deflection" is not just a term to memorize; it is the unseen gap that ruins your angle. "Crowning" is not an optional feature; it is the physical wedge that closes that gap. Without understanding the terminology, you cannot diagnose the failure.

You can learn to control the machine’s physical flex to achieve a perfectly straight bend, but where did the dimensions for that flat piece of steel originate?

Zone 5: The Controller's Math (Blank Calculations)

We just spent considerable time addressing the machine's physical flex. But before you even press the pedal—before you think about the ram bowing or the tooling breaking—you must provide the machine with a piece of steel. How did you determine the exact length to cut that flat blank?

Given that ADH Machine Tool invests more than 8% of annual sales revenue in research and development. ADH operates R&D capabilities across press brakes, for readers who want detailed materials, brochures is a useful follow-up resource.

Take a thick rubber eraser and bend it in half.

Observe the outer curve—it stretches tight. Look at the inner curve—it wrinkles and compresses. Steel behaves the same way. When you force a flat sheet into a 90-degree corner, the metal physically elongates. If you simply total the outside dimensions of your finished part and cut the flat sheet to that exact length, the final part will be too long. The CNC controller’s calculations are not merely digital arithmetic; they are our method of predicting that physical stretch before the laser cuts the blank.

Bend allowance vs. bend deduction: Which value actually determines your flat cut length?

It depends entirely on whether your part must slide into a narrow slot or wrap around a fixed block.

For a deeper look at how controller parameters, machine rigidity, and specification limits influence these calculations in real production settings, see this related guide to press brake specifications. It expands on the technical factors that shape how bend allowance and deduction are applied on modern machines such as those developed by ADH Machine Tool, where frame design and verification play a direct role in bending accuracy.

Bend allowance represents the physical arc length of the metal through the bend. Bend deduction is the amount you subtract from the total outside dimensions to compensate for the metal’s stretching. They are two expressions of the same principle, but you select between them based on which surface of the metal controls whether the part functions properly.

If you are fabricating an electrical box whose external footprint must sit precisely against a wall, you calculate from the outside dimensions and subtract the bend deduction. If you are forming a bracket where the internal gap must closely fit around a pipe, you calculate from the inside dimensions and add the bend allowance. You are not merely selecting a formula from a drop-down menu. You are instructing the machine whether the inside or the outside surface of the steel is the controlling dimension.

The K-Factor: Is it a universal mathematical constant or an informed estimate?

Open a textbook, and it will state that the K-Factor for a standard bend is 0.33.

Do not rely on the textbook. The K-Factor is a multiplier that tells the controller precisely where stretching ends and compression begins within the sheet thickness. However, paper does not bend steel. That theoretical value of 0.33 assumes ideal conditions. In practice, as soon as you change the sheet’s grain direction, switch to a punch with a sharper tip, or use a slightly harder batch of aluminum, the metal stretches differently and the value shifts.

Shop Floor Reality: Never run a production batch of fifty parts using a default K-Factor stored in the controller’s memory. You will scrap forty-nine of them. You must bend a scrap piece, measure the actual stretch with calipers, and adjust the controller’s calculations to match the specific steel in front of you.

The Neutral Axis: Why calculate for a region of the metal that does not stretch at all?

Because you cannot measure something you cannot see.

When the punch forces the metal into the die, the top layer of the steel compresses inward. The bottom layer stretches outward. Somewhere between them, within that cross-section, lies a microscopic layer of material that does neither. It simply rotates.

This layer is the neutral axis.

It is the only dimension in the entire piece of steel that remains exactly the same length when flat as when bent. If you calculate the flat blank based on the stretching outer layer, your results will vary depending on how forcefully the punch strikes or how wide the die opening is. By anchoring all calculations to the neutral axis, you provide the controller with a fixed, unchanging physical reference point. The calculations work because they disregard the deformation at the surfaces and focus on the stable center.

We have charted the machine's flex, the tooling's engagement, and the metal's internal elongation. Yet all of this physical geometry is meaningless if you cannot convey these realities to the next operator when the shift changes and the machine begins to behave unpredictably.

If your team is struggling to standardize calculations, align controller logic with real-world material behavior, or evaluate whether a different CNC platform would improve repeatability between shifts, it may be time for a deeper technical discussion. With a 100% CNC-based product portfolio and dedicated R&D across press brakes and industrial automation, ADH Machine Tool works closely with fabricators to align machine logic, tooling strategy, and shop-floor communication. You can contact ADH Machine Tool to discuss your application, request a technical consultation, or evaluate solutions tailored to your production environment.

The Ultimate Test: Using Terminology to Troubleshoot and Stay Safe

You just spent an hour overriding the controller's theoretical calculations to match the physical behavior of stretching steel. The part is finally bending correctly. But when the shift whistle blows, leaving a sticky note on the controller that says "math is weird today" ensures the next operator will scrap the first run. You must translate the physical behavior of that metal back into clear language. Terminology is how we document the forces at work inside the machine so the next operator does not walk blindly into a problem.

Light curtains, guarding, and E-stops: What exactly is being interrupted in those milliseconds?

You break the invisible laser plane of the light curtain, and the ram stops. But a press brake is a 100-ton steel jaw. When you hit the Emergency Stop (E-stop) button, you are not merely cutting electrical power. You are forcing hydraulic valves closed to halt thousands of pounds of descending steel.

If you are bottom bending or coining—compressing the material with extreme tonnage to lock in the angle—the machine is under tremendous pressure. The guarding is not just a regulatory formality. It is the physical barrier that keeps you outside the blast radius if a die fractures under that load. If you do not understand the difference between a light curtain muting point, where the lasers intentionally deactivate so the bending metal can swing upward, and fixed guarding, you will place your hands exactly where the machine assumes they are not.

The "Pinch Point" vs. The "Bend Line": Where should your eyes actually be?

Safety manuals instruct you to watch the pinch point—the precise horizontal gap where the punch tip traps the steel against the die. You must know exactly where this compression zone is to keep your fingers clear. But focusing only on the pinch point leaves you unaware of how the metal is truly behaving.

Your eyes need to follow the bend line. The bend line is the physical axis across the sheet where the material flows, stretches, and yields. If a hole or cutout is too close to that bend line, the metal will follow the path of least resistance. It will pull, pucker, and tear out the side of your part. If your flange is shorter than the machine's minimum bendable length, it will not seat properly in the V-die, twisting the entire sheet out of your hands as the ram descends. You watch the pinch point to protect your fingers; you watch the bend line to protect your part.

How to describe a bad bend to a veteran without just pointing and saying "it's messed up"

This is where vocabulary protects your job. When a part fails, pointing at a distorted piece of steel and saying "it's messed up" provides no useful information. I cannot fix "messed up."

But if you tell me, "The punch is bottoming out in the die before the flange clears the backgauge fingers," we now have a physical description of the problem. You have identified that the vertical stroke depth is interfering with the horizontal retraction of the stops. That is something we can correct. If you tell me the material is tearing because we are forcing a tight inside radius on a thick sheet of aluminum, we can switch to a punch with a larger tip radius.

Shop Floor Reality: If you write "machine bending crooked" in the shift log, the morning operator will simply press the pedal and scrap the first part. Write "crowning wedge requires +0.020 adjustment to compensate for bed deflection," and you provide the precise physical adjustment needed to complete the run successfully.

You do not memorize these terms to pass a written exam. You use them because they are the only tools precise enough to analyze a failure. When you can identify the exact physical force damaging your part, you stop being a machine attendant. You become a fabricator.

Looking for Machines?

If you're looking for sheet metal fabrication machines, then you've come to the right place!

Our Customers

The following big brands are using our machines.
Contact Us
Not sure which machine is right for your sheet metal product? Let our knowledgeable sales team guide you in selecting the most suitable solution for your needs.
Ask An Expert
Privacy PolicyTerms
Copyright © 2026
linkedin facebook pinterest youtube rss twitter instagram facebook-blank rss-blank linkedin-blank pinterest youtube twitter instagram